|
 |
The Memotech MTX Series |
 |
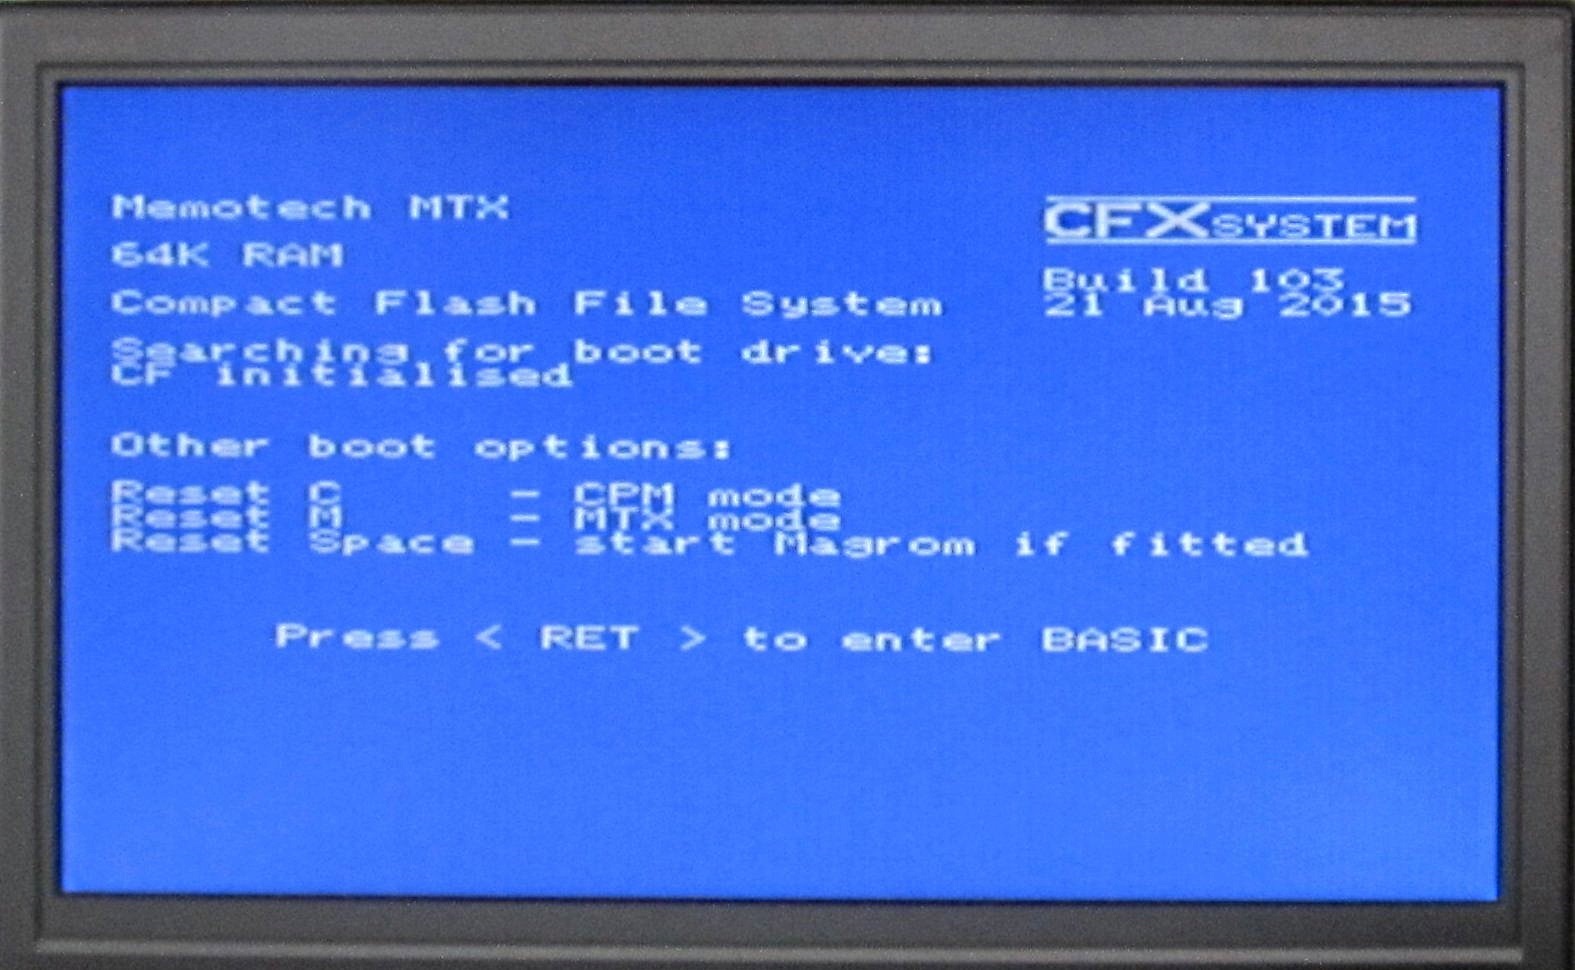
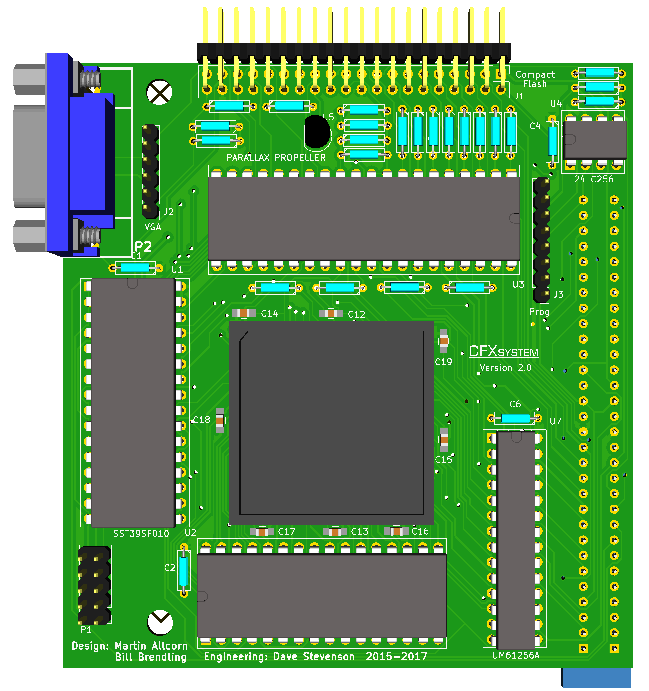
Memotech Compact Flash System - Version 2
CFX - II Video Modes
one ?)
Video Modes and their
usage
Bill has documented the video modes available in CFX-II in an
Open Office document and a
PDF - I have
transcribed the content on this page.
CFX-II
Video Modes
Bill
Brendling 17 May 2020
Introduction
The VGA output from the CFX-II board is produced by a
Parallax Propeller microcontroller chip. This supports a number
of different operating modes:
- 80 x 24 text modes with 160 x 96 graphics, largely
similar to the Memotech 80 column card:
- 16 colour mode compatible with the Memotech card
using colour output.
- Monochrome (green) mode compatible with the Memotech
card using monochrome output.
- Enhanced 64 colour mode.
- 320 x 240 graphics mode with 40 x 24 text:
- 2 out of 64 colours per character cell.
- MTX VDP emulation mode:
- Text mode: 40 x 24 characters.
- Graphics mode I: 256 x 192 graphics, 2 out of 16
colours per 16 character cells.
- Graphics mode II: 256 x 192 graphics, 2 out of 16
colours per character cell.
- Multi-colour mode: 80 x 48 independent colour tiles.
The VDP emulation modes shadow the hardware interface of the
VDP, reproducing what is displayed on the composite video
output. The 80 column modes are software compatible with the
original Memotech card, but with a different hardware interface.
BASIC Support
By default, when in BASIC mode, the CFX VGA output echoes the
output produced by the original VDP output. However the latest
CFX ROM allows use of some of the other capabilities of the VGA
display from within BASIC. It does this by introducing two new
screen types that can be used with the CRVS command:
Type 3: 80 columns x 24 rows of cells
- Each cell is 8 x 20 VGA pixels
- Each character cell contains 2 x 4 plot points (each
plot point being 4 x 5 VGA pixels). A total of 160 x 96 plot
points on the screen.
- A cell may contain a character, or plot points, but not
both.
- Each cell has two colours, foreground and background.
Type 2: 40 columns x 24 rows of cells
- Each cell is 16 x 20 VGA pixels, but individual pixels
cannot be controlled
- Each cell contains 8 x 10 plot points (each plot point
being 2 x 2 VGA pixels). A total of 320 x 240 plot points on
the screen.
- Plotting may go over characters.
- Each cell has two colours, foreground and background.
As with the original type 0 (text) and type 1 (graphics)
screens, the CRVS command can be used to define multiple virtual
screens with different sizes and positions within a screen type.
It should be noted that while multiple virtual screens may be
shown at the same time, they must all be of the same screen
type. This is not a new restriction, the original Memotech
cannot display a type 0 (text) and a type 1 (graphics) screen at
the same time.
It should be noted that the CRVS command
also has the effect of selecting the newly created virtual
screen. This is not new, it has always been the case for
Memotech Basic, but less obvious with only type 0 and type 1
screens. When a type 2 or type 3 screen is selected, the VGA
monitor will flicker for a few seconds as the Propeller changes
out of VDP emulation mode and into the new mode.
A
number of the Basic commands behave differently with the new
screen types. There are also a few new USER commands to support
these screen types. The remainder of this section outlines the
differences
Sprites
Neither type 2 nor type 3 screens support sprites. Therefore
any of the sprite commands will produce an error if used with
these screen types.
Plotting
Both type 2 and type 3 screens support plotting, and all the
plotting commands may be used on either screen type.
For a type 3 screen the resolution is low, and plotting over
a character replaces the character at that location.
Type 2 screens have a higher resolution, and plotting at a
character position will draw over the character. The existing
plotting commands allow a maximum x-coordinate of 255, whereas a
type 2 VS may be up to 320 plot-points wide (maximum
x-coordinate of 319). There are two ways of working around this
limitation. The plot coordinates are measured from the bottom
left hand corner of the virtual screen, so by adjusting the
position of this it is possible to plot at any position on the
display.
Secondly, there are two new USER commands:
USER PLOT x, y
USER LINE x1, y1, x2, y2
which can be used for type 2 screens. They work the same way
as the standard PLOT and LINE commands, except that they permit
x-coordinates up to 319. It should also be noted that each
character cell may only have two colours, one foreground and one
background. So plotting at a location may change the colour of
other points in the same character cell. The original Memotech
type 1 screen has a similar limitation but it may be less
obvious as it applies to single rows of 8 pixels.
ATTR command
The four attributes work, as far as possible, the same way on
type 2 and type 3 screens as they do on type 1.
Attribute 1: Inverse print – Characters
are printed in the paper colour on a background of the ink
colour.
Attribute 2: Over print – On type 2
screens new characters are printed on top of any existing
character. This is not possible on type 3 screens so this
attribute has no effect on type 3 screens.
Attribute 3: Unplot – Removes plotted
points, resetting them to the paper colour,
Attribute 4: Overplot – Reverses the
state of plotted points, removing those previously plotted (so
they become paper colour) or plotting points not previously
plotted (so they become ink colour).
Note that turning on both attributes 3 and 4 results in
plotting having no effect.
COLOUR command
This works as for type 1 screens, except that there is no
border, so setting the border colour has no effect.
GENPAT
command
Characters on a type 3 screen occupy 8 x 20
pixels, therefore it needs 20 bytes to define their shape.
The GENPAT command only specifies 8 bytes, therefore three
GENPAT commands are needed to completely redefine the shape
of a character. The format of the command is:
GENPAT
p,n,d1,d2,d3,d4,d5,d6,d7,d8
In this command p=0 to redefine rows 1 to 8
of a character, p=1 to redefine rows 9-16 of a character and
p=2 to redefine rows 17-20 of the character.
n is the ASCII code of the character to
redefine (0-255).
d1 to d8 are the bytes defining successive
rows. For p=2, d5 to d8 are ignored, but must be present.
Type 2 screens use the same font as type 3,
but only uses every other row to give an 8 x 10 character.
Redefining a character lasts for as long as
a type 2 or type 3 screen is selected. Switching to a type 0
or 1 screen looses all the user definitions and characters
will have their default shape when a type 2 or 3 screen is
selected again.
GR$ function
The function GR$(x,y,n) returns a character
whose ASCII value is made up of a column of n (1 to 8)
plot-points, starting at the coordinate (x,y).
For type 2 screens, the plot-points may be
the result of a character printed at that location, or of a
point plotted there.
For type 3 screens, any location containing
a printed character is regarded as having no plotted points.
SPK$ function
This function returns the character under
the cursor, and advances the cursor.
For type 3 screens it returns the character
at that location regardless of any attributes (such as
inverse printing) that may have been applied. Any character
location containing plotting will return an ASCII NULL
(zero) character.
For type 2 screens it works by recognising
the plot pattern at that location. It will therefore fail
(and return ASCII NULL) if the character has been
over-plotted, is inverse, or contains the underline cursor.
It will however work for user-defined character shapes
providing they are clear.
USER COLOUR
command
Memotech Basic supports 16 colours, as
generated by the VDP. However the Propeller VGA display is
capable of generating 64 colours. By default 16 of these 64
colours which approximate to the VDP are used. However the
USER COLOUR command provides the ability to change these.
The format of this command is:
USER COLOUR c, r, g, b
Where:
c = Colour to redefine
(0 to 15)
r = Red value for this
colour (0 to 3)
g = Green value for
this colour (0 to 3)
b = Blue value for this
colour (0 to 3)
Note: This command will not change the
colour of any text that is already displayed. The correct
sequence is:
By repeating this sequence all 64 colours
may be displayed at the same time.
USER VGA command
This command enables you to use an 80 column screen for
editing programs. The format of this command is:
USER VGA mode
where mode = 1 for 80 column editing, and mode = 0 to
return to 40 column editing. The effect of selecting 80
column mode is to change the definitions of virtual screens
0, 1, 5 and 7 to be type 3 screens. As a result program
listing and editing uses the 80 column screen type.
The default graphics virtual screen (VS 4) is changed to
a type 2 screen. This does mean that sprites cannot be used
without redefining the screen.
If 80 column mode is selected, it will also be used for
PANEL, although that does not make any use of the extra
screen space.
If you have two monitors attached to the Memotech, one on
the original composite VDP output and a second on the CFX-II
VGA output, then there are two further modes (mode =2 or
mode = 3) that may be usefully selected. If these modes are
selected, then the CFX-II display does not switch back to
VDP echo mode when virtual screens of types 0 or 1 are
selected. Instead it continues to display what was written
to the type 2 or type 3 virtual screens. Thus it is possible
to make use of both monitors by having some virtual screens
of type 0 or type 1, which will be displayed on the
composite video monitor, and other virtual screens of type 2
or 3 will be displayed on the VGA monitor.
The difference between VGA modes 2 and 3 is that in mode
2, virtual screens 0, 1, 5 and 7 default to type 0, so Basic
editing and PANEL will be on the composite monitor, whereas
in VGA mode 3 these virtual screens default to type 3, so
that Basic editing and PANEL will be in 80 columns on the
VGA monitor.
Summary of Control and
Escape Codes
The following tables summarises the use of control and
escape codes from within MTX Basic, the CP/M driver for the
original Memotech 80 column card, and the CFX-II 80 column
display. Note that when using the 80 column display from MTX
Basic as described in the previous section the MTX ROM
processes all the control and escape codes, so the first
column of the tables is relevant. The third column is only
applicable for CP/M, or bypassing the MTX ROM by writing to
port 96 (60 hex).
Control Codes
|
Hex
|
Letter
|
MTX Basic
|
Memotech 80 Col
|
CFX-II VGA
|
|
0x01
|
A
|
Plots point
|
Plots point
|
Plots point
|
|
0x02
|
B
|
Plots line
|
Plots line
|
Plots line
|
|
0x03
|
C
|
Position cursor
|
Position cursor
|
Position cursor
|
|
0x04
|
D
|
Sets background colour
|
Sets background colour
|
Sets background colour
|
|
0x05
|
E
|
Erase to end of line
|
Erase to end of line
|
Erase to end of line
|
|
0x06
|
F
|
Sets foreground colour
|
Sets colours /attributes
|
Sets foreground colour
|
|
0x07
|
G
|
Sounds bell
|
Sounds bell
|
|
|
0x08
|
H
|
Backspace
|
Backspace
|
Backspace
|
|
0x09
|
I
|
Tab
|
Tab
|
Tab
|
|
0x0A
|
J
|
Line feed
|
Line feed
|
Line feed
|
|
0x0B
|
K
|
Cursor up
|
Cursor up
|
Cursor up
|
|
0x0C
|
L
|
Clear screen
|
Clear screen
|
Clear screen
|
|
0x0D
|
M
|
Carriage return
|
Carriage return
|
Carriage return
|
|
0x0E
|
N
|
CTLSPR
|
Blink on
|
Blink on
|
|
0x0F
|
O
|
GENPAT
|
Blink off
|
Blink off
|
|
0x10
|
P
|
COLOUR
|
Black foreground
|
Black foreground
|
|
0x11
|
Q
|
ADJSPR
|
Red foreground
|
Red foreground
|
|
0x12
|
R
|
SPRITE
|
Green foreground
|
Green foreground
|
|
0x13
|
S
|
MOVSPR
|
Yellow foreground
|
Yellow foreground
|
|
0x14
|
T
|
VIEW
|
Blue foreground
|
Blue foreground
|
|
0x15
|
U
|
Insert key
|
Magenta foreground
|
Magenta foreground
|
|
0x16
|
V
|
Delete key
|
Cyan foreground
|
Cyan foreground
|
|
0x17
|
W
|
Tab back
|
White foreground
|
White foreground
|
|
0x18
|
X
|
White text on black
|
Initialise configuration
|
Initialise configuration
|
|
0x19
|
Y
|
Cursor right
|
Cursor right
|
Cursor right
|
|
0x1A
|
Z
|
Home cursor
|
Home cursor
|
Home cursor
|
|
0x1B
|
[
|
Escape
|
Escape
|
Escape
|
|
0x1C
|
\
|
Scroll mode
|
Scroll mode
|
Scroll mode
|
|
0x1D
|
]
|
Page mode
|
Page mode
|
Page mode
|
|
0x1E
|
^
|
Show cursor
|
Show cursor
|
Show cursor
|
|
0x1F
|
_
|
Hide cursor
|
Hide cursor
|
Hide cursor
|
Escape Codes
|
Letter
|
MTX Basic
|
Memotech 80 Col
|
CFX-II VGA
|
|
A
|
ATTR
|
Select alternate font
|
Select alternate alpha font
|
|
B
|
Select language
|
Set bit of both attributes
|
Set bit of both attributes
|
|
C
|
GR$
|
Scroll mode
|
Scroll mode
|
|
D
|
Invalid
|
Page mode
|
Page mode
|
|
E
|
Invalid
|
Show cursor
|
Show cursor
|
|
F
|
Invalid
|
Hide cursor
|
Hide cursor
|
|
G
|
Invalid
|
Select graphics font
|
Select lower graphics font
|
|
H
|
Invalid
|
|
Delete character under cursor
|
|
I
|
Insert blank line
|
Insert blank line
|
Insert blank line
|
|
J
|
Delete the current line
|
Delete the current line
|
Delete the current line
|
|
K
|
Duplicates a line
|
|
Duplicates a line
|
|
L
|
Read character at cursor
|
|
|
|
M
|
Invalid
|
|
Redefine char.
|
|
N
|
Invalid
|
Set bit of non-printing attrib.
|
Set bit of non-printing attrib.
|
|
O
|
Invalid
|
|
Select virtual screen
|
|
P
|
Toggle Page / Scroll
|
Set bit of printing attributes
|
Set bit of printing attributes
|
|
Q
|
Invalid
|
|
Input 8-bit characters
|
|
R
|
Set print colour, clear attributes
|
|
Input raw buffer data
|
|
S
|
Invalid
|
Select standard font
|
Select standard alpha font
|
|
T
|
Invalid
|
Set printing attributes
|
Set printing attributes
|
|
U
|
Reset screen
|
Set non-printing attributes
|
Set non-printing attributes
|
|
V
|
BASIC setup
|
Set both attributes
|
Set both attributes
|
|
W
|
PANEL Setup
|
Set write mask
|
Set write mask
|
|
X
|
Simulate control code
|
Simulate control code
|
Simulate control code
|
|
Y
|
CRVS
|
|
Define virtual screen
|
|
Z
|
VS
|
|
Reboot
|
|
[
|
|
|
|
|
\
|
|
|
|
|
]
|
|
|
|
|
^
|
|
|
Copy characters
|
|
_
|
|
|
Space characters
|
|