|
 |
The Memotech MTX Series |
 |
Bill Brendling's version of MEMU
This page describes Bill Brendling's
enhancements Andy's MEMU emulator. The contents of this page
were supplied by Bill but the page has been formatted to align
with the rest of the site, this includes reducing the displayed
image sizes. Clicking on the images will display the original,
full size, image files. Bill's original html file can be found
here.
Update November 2022
Bill has decided to use Github to release future updates of
his version of MEMU, his repository can be found at
https://github.com/Memotech-Bill/MEMU
Whilst I am sure that Github is likely to be fine,
personally, I prefer to have access to "essential" downloads
more in my control, rather than be reliant on the likes of
Microsoft's continuing support for Github etc. Therefore, I will
continue to host Bill's version of MEMU on this page, though it
may not always be the latest version - which will, Microsoft
permitting, be available from Bill's page.
Introduction
Andy Key's MEMU is an extremely effective,
feature rich, and flexible emulator for the Memotech MTX series of computers, without which
none of the following would have been possible. One of the consequences of MEMU's
flexibility
is that running the program requires supplying a number of command line switches to specify the
details of the emulation required. A number of potential users find this
off-putting, this
was reiterated at the last
Memofest meetup. There are
a number of possible solutions to this issue:
- It is possible to create a number of batch files (Windows) or command scripts (Linux)
which run MEMU in a specific emulation mode.
- Paul Daniels has produced a version of
Gamebase
which can be used to run many MTX games.
- I wrote a Python based
Launcher which can start MEMU in a number of standard emulation modes. However this
does not support all the MEMU features.
When I first started playing with MEMU one of my main objectives was to turn a Raspberry Pi
computer into a "Bare Metal" emulation of the MTX. This means no operating system and therefore
no command line from which to specify the required switches. Therefore I had to provide a system
for setting the configuration from within MEMU. Again I went for the option of providing a few
"typical" configurations rather than supporting all of the options that MEMU can provide.
I therefore added the option of a configuration dialog as shown: |
 |
While originally developed for the "bare metal" version, the dialog can also be included in
Windows or Linux versions of MEMU, which may be of interest for the reasons given above.
My version of MEMU has also acquired a few other features which have not yet been included
in Andy's version:
- The configuration dialog, as above. By default the initial configuration is read from
"memu.cfg" in the same folder as the program executable. Changes made with the configuration
dialog are saved back into this file. An alternative configuration file may be specified
using the -config-file option on the command line. Other options may be specified on the
command line as per Andy's MEMU. (Windows, Linux & Raspberry Pi)
- Loading programs from or saving to audio (*.wav) files instead of data (*.mtx)
files. This provides one way of developing a program on MEMU and then transferring
it to a real MTX (or vice-versa). (Windows, Linux & Raspberry Pi)
- Emulation of the CFX-II addon, including the Propeller VGA display.
(Windows, Linux & Raspberry Pi)
- Running Fuzix (a Unix/Linux clone). This relies upon
the CFX-II emulation. (Windows, Linux & Raspberry Pi)
- Enhanced keyboard remapping
to improve the usability of MEMU with modern keyboards. This follows the approach used for
the PC keyboard
interface, and allows the keyboard mapping to be changed dynamically, using the
<Scroll Lock> and <Num Lock> keys. (Windows, Linux & Raspberry Pi)
- Using a real serial port to emulate the MTX serial port. This allows multiple machines
running MEMU to be connected in a NODE ring. This has been tested with a Raspberry Pi connected
to an x86 PC. It should be possible to similarly connect MEMU to a real MTX, but this has
not been tested. (Linux only, including Raspbian)
- Use of Raspberry Pi GPIO to connect MEMU to real hardware, including keyboard, joystick and
printer. (Raspberry Pi including bare metal)
- Use of Raspberry Pi GPU to accelerate MEMU display. (Raspbian only)
Conversely, my version can be a year (or more) behind the latest features added to Andy's version.
For convenience I have created a number of distributions:
Distributions
(Downloads)
Microsoft Windows RuntimeThis contains two 32-bit versions of MEMU:
- memu.exe
- This is the classic command line version of MEMU.
- memu-cfg.exe
- This is the version of MEMU with configuration dialog.
To install, simply unzip the distribution into a suitable location, perhaps "Program Files (x86)".
It may be worth creating a desktop shortcut, pointing to "memu-cfg.exe", with the working folder
set to the folder containing the program.
Linux (x86) RuntimeThis distribution contains four versions of MEMU. Two are for use with X-Window displays:
- memu
- This is the classic command line version of MEMU.
- memu-cfg
- This is the version of MEMU with configuration dialog.
The other two are for use from the console, without X-Window, and display full screen.
Use <Ctrl> plus the function keys to switch between VDP display and 80-column display:
- memu-fb
- This is the command line version of MEMU using full-screen frame buffer.
- memu-cfb
- This is the configuration dialog version of MEMU using full-screen frame buffer.
To install, unzip the file into s suitable location. Optionally copy the contents of the "memu"
folder into a location on the path, such as "/usr/local/bin".
Raspbian RuntimeThis distribution contains the same four executables as the Linux distribution, but compiled
for 32-bit ARM. It also contains a fifth executable:
- memu-pi
- This version of MEMU is intended for use from the console, without X-Window. It displays
full-screen, using the Raspberry Pi GPU. It can also use the GPIO to interface to real hardware.
Bare Metal RuntimeThis distribution contains the bare metal version of MEMU (with
configuration dialog), compiled for different versions of the Raspberry Pi.
At present the following are NOT supported:
- Running on a Raspberry Pi model 4B
- Serial port (DART) emulation
- GPU acceleration
Source DistributionThis distribution contains the source code for all the above versions. There are build scripts
in the top level folder for building all versions. The building has to be performed on the
appropriate hardware (Windows, x86 Linux or Raspberry Pi) for the distribution being built.
Cross-compilation is not currently supported.
To save space, none of the ROMs, disk or tape images are in this distribution, you need at
least one runtime distribution. The runtime should be installed in a folder "memu" under the
top level folder.
Configuration Dialog VersionsWhen first started, the configuration dialog versions of MEMU start in whichever emulation
mode was last saved in the configuration file. To display the configuration dialog, use one
of the following keys:
- <SysReq> key
- Left <Windows> key
- Right <Windows> key
- <F11> key
Different operating systems trap different key strokes for their own use, so try each of these
to find one that works. Once in the dialog, use the arrow keys to navigate, and either the
space bar or <Enter> key to select an item. To exit the dialog and return to the emulation
select one of the options from the bottom line of the dialog. Note that "Exit" is exit the program
not exit the dialog.
While the emulation is running, the following key strokes are also processed:
- Pressing both the <Alt> keys and then releasing them reboots the emulation. The reboot
actually happens when the first of the keys is released. In CFX emulation, selecting a mode
requires holding another key down while rebooting. Depending upon the operating system being
used, try either of the following:
- Press and hold one <Alt> key. Press and hold the required letter key. Press and
release the second <Alt> key. Release the first <Alt> key. Release the letter
key after a few seconds.
- Press and hold both <Alt> keys. Press and hold the required letter key. Release
the <Alt> keys. Release the letter key after a few seconds.
- If keyboard mapping is enabled, then the following keys influence the mapping applied:
- If <Scroll Lock> is off, then the keys exactly as on the MTX are emulated.
This will work with all MTX software, but means that for some symbols you have to
press a differently labeled key on the PC keyboard. See
here for details.
If <Scroll Lock> is on, then keys which do not exist on the real MTX are
emulated to produce characters matching the symbols on the PC keyboard. The MTX ROM
and CP/M are patched to recognise these additional keys, but they will not work with
any software which has its own keyboard driver.
- If <Num Lock> is off, to assist game play, the PC numeric keypad is mapped
to the MTX keypad by key position. However this means that the keypad keys do not
produce the numbers shown on the keys. If <Num Lock> is on, then the mapping
is changed so that the numeric keypad produces the expected numbers.
On some operating systems, it is not possible to ensure that the keyboard LEDs match
the lock state as seen by MEMU. If keys are not producing the expected result it is
therefore worth changing the lock states.
Within the configuration dialog, if "Audio Tapes" is turned off ("No") then only binary
(*.mtx) tape files can be selected. In this mode, tape files will load very quickly.
If "Audio Tapes" is turned on ("Yes"), then either binary (*.mtx) or audio (*.wav) tape
files may be selected. However all files will be slow to load (realistic speed), and
you will hear an approximation of the tape loading sounds. Binary files are effectivly
converted back to audio in order to load them. Audio files in other formats such as *.mp3
must be converted to *.wav before they can be used.
The supplied disk images are in a number of sizes:
- Files with an extension of "*.mfloppy" or "*.mfloppy-07" are 640KB type 07 floppy
disk images which may be used as B: or C: disks in SDX or CP/M emulations.
- Files with an extension of "*.img" are 8MB CP/M partitions. They may be used as either
Compact Flash partitions (types 18 to 1F) or Silicon Disks (type 4F).
- "ht.bin" is a large data image used by Hextrain. It is not
readily accessible to other MTX software.
- "fuzix.drive" is an image of a multi-partition drive, for booting
Fuzix.
|
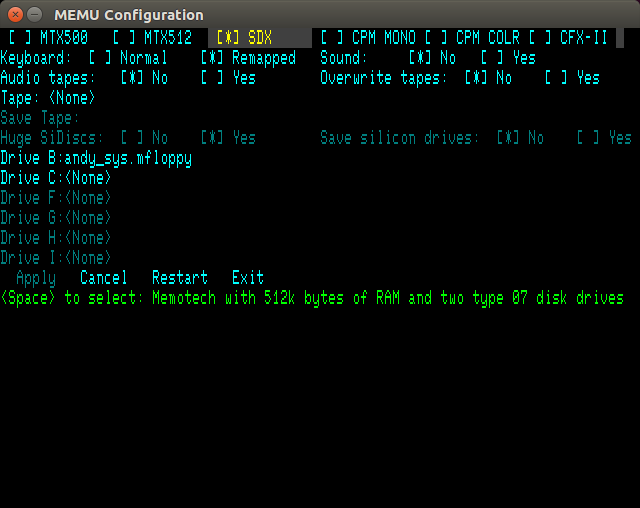
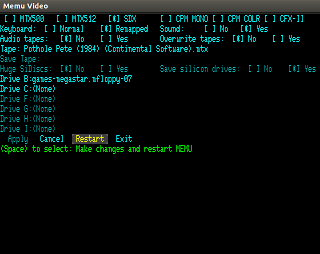
Typical configuration for SDX emulation
The image opposite shows a typical configuration for SDX emulation, with a tape file ready
for loading with the command LOAD "", and a disk of games available for
USER LOAD "game".
Any user programs can be saved with USER SAVE "name"
|
 |
|
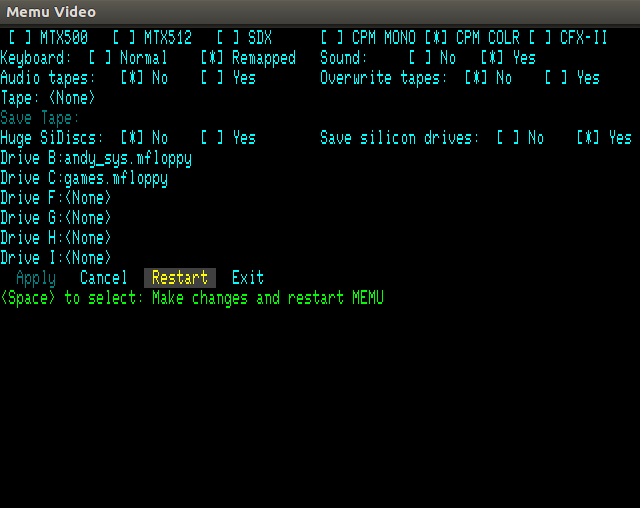
Typical configuration for CP/M emulation
A typical configuration for CP/M emulation, with two floppy disks, is shown
opposite.
|
 |
|
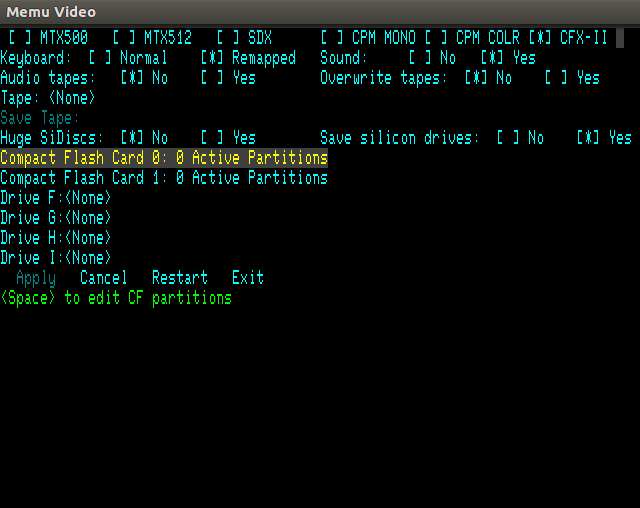
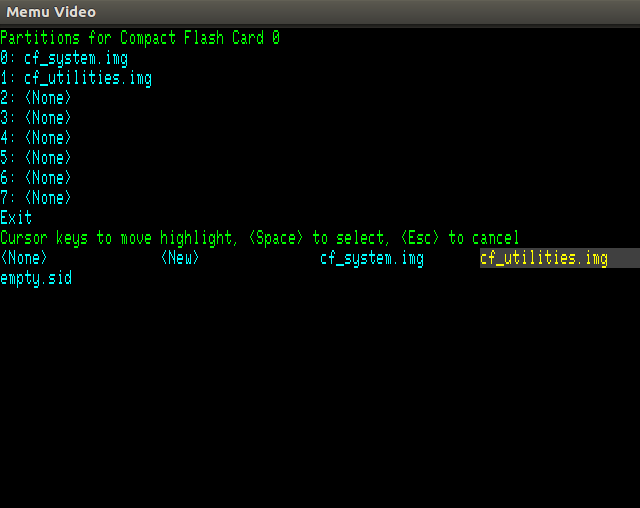
Typical configuration for CFX-II emulation
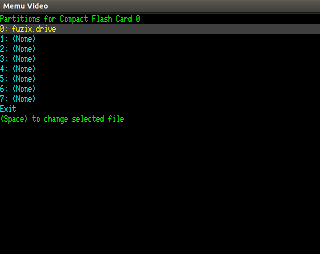
1 For the CFX-II it is
necessary to open a sub-dialog to select the
files to form partitions on the emulated Compact
Flash cards.
|
 |
|
Typical configuration for CFX-II emulation
2 To open this dialog, select
the Compact Flash card on the main dialog, and
then use <Space> or <Enter> to open the
sub-dialog.
|
 |
|
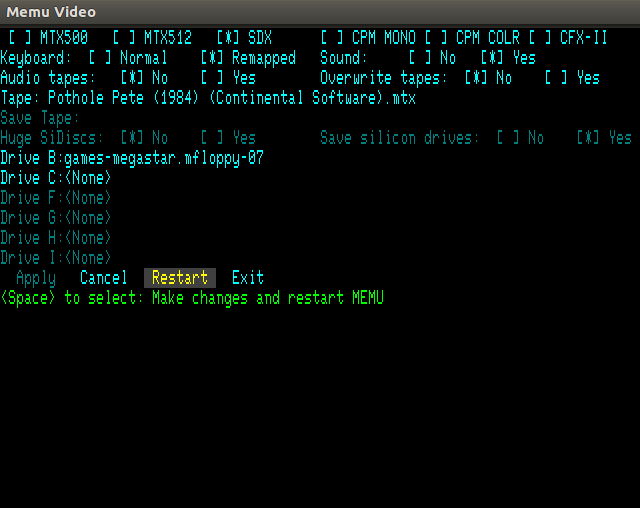
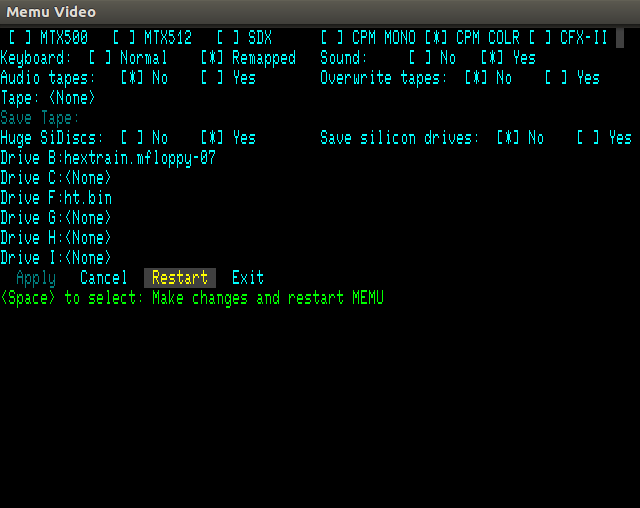
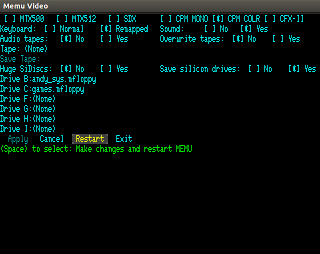
Hextrain configuration Hextrain is Andy Key's incredible
MTX game with 3D graphics.
To run this, set the configuration as shown and restart.
Once CP/M
has started type the command "hextrain" (renamed from "htsi"), and then
switch to the VDP window or display
|
 |
|
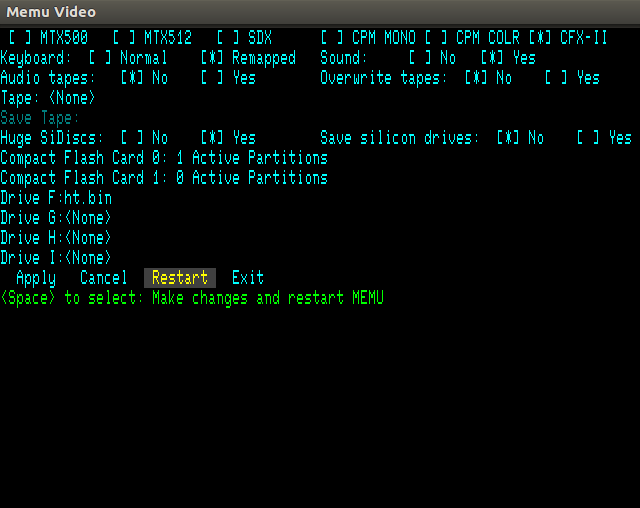
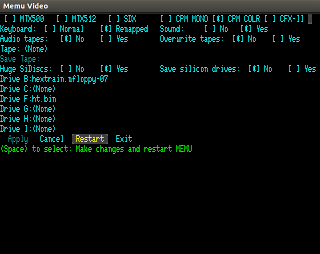
Fuzix configuration 1 Fuzix is a Unix like operating system for Z80 machines.
It has been ported to the MTX with CFX-II storage add-on, and can be run in MEMU. To run
it, set the configuration as shown:
|
 |
Fuzix configuration 2
Restart, then once the CFX-2 startup page is
showing, reboot using the two <Alt> keys with
the "C" key down, as if rebooting to CP/M. |
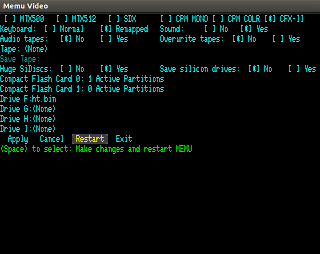 |
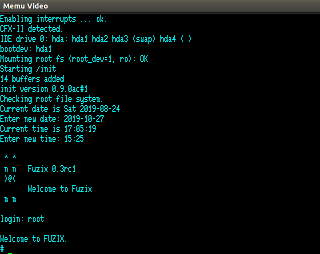
Fuzix configuration 3
When prompted for "bootdev:", enter "hda1"
(without the quotes). Enter the date and time
when requested. Finally login as "root". When
finished using Fuzix, enter the command
"shutdown" to cleanly unmount the emulated
drives and halt the system. Otherwise a lengthy
check of drive integrity will be required next
time Fuzix is started. |
 |
|
Configuration
Options |
| Group |
Option |
Description |
| Hardware |
MTX500 |
Memotech MTX500 With 32k byte of RAM |
| |
MTX512 |
Memotech MTX500 With 64k byte of RAM |
| |
SDX |
Memotech with 576k bytes of RAM and two type 07
disks |
| |
CPM MONO |
576k bytes of RAM, two type 07 drives, CP/M mono
monitor |
| |
CPM COLR |
576k bytes of RAM, two type 07 drives, CP/M
colour monitor |
| |
CFX-II |
576k bytes of RAM, two CF cards, Propeller VGA
Display |
| Keyboard |
Normal Keyboard |
Keys match MTX keyboard - Not always PC key
symbols |
| |
Remapped Keyboard |
Multiple keyboard modes - More closely match PC
key symbols |
|
Further details of the keyboard remapping function is described
on Andy's
MEMU keyboard page.
|
| Sound |
No |
Sound Disabled |
| |
Yes |
Sound Enabled |
| Audio Tapes |
No |
".mtx" files Only |
| |
Yes |
".mtx" and ".wav" Files |
| Tape |
Select "tape" to load |
Use Cursor Keys to select the required tape
(.mtx) file |
| Save Tape |
Select save "tape" |
Use Cursor Keys to select the required tape
(.mtx) file |
| Huge SiDiscs |
No |
[For CFX] SiDiscs limited to 8MB |
| |
Yes |
[For CFX] Huge SiDiscs for HexTrain |
| Save Si Drives |
No |
[For CFX] SiDiscs contents lost on exit |
| |
Yes |
[For CFX] SiDiscs contents saved (slow for huge
discs) |
| CF Card 0 |
Select "disk" to load |
[For CFX] Edit CF Partitions |
| CF Card 1 |
Select "disk" to load |
[For CFX] Edit CF Partitions |
| Drive B: |
Select "disk" to load |
[SDX/CPM] Select the required disk (.mfloppy)
file |
| Drive C: |
Select "disk" to load |
[SDX/CPM] Select the required disk (.mfloppy)
file |
| Drive F: |
Select "disk" to load |
[CPM/CFX] Select the required disk image
file |
| Drive G: |
Select "disk" to load |
[CPM/CFX] Select the required disk image
file |
| Drive H: |
Select "disk" to load |
[CPM/CFX] Select the required disk image
file |
| Drive I: |
Select "disk" to load |
[CPM/CFX] Select the required disk image
file |
| Action |
Apply |
Change disk and/or tape and continue MEMU |
| |
Cancel |
Continue MEMU with no changes |
| |
Restart |
Make changes and restart MEMU |
| |
Exit |
Exit MEMU and shutdown the Raspberry Pi |
Command Line VersionsMost of the command line usage is as per Andy Key's
Documentation which is repeated here.
| Switch |
Description |
|---|
| -iobyte iobyte |
specify IOBYTE (initially 0x00) |
| -subpage subpage |
set ROM subpage (initially 0) |
| -addr addr |
set the address (initially 0x0000) |
| -mem file |
load file at address |
| -mem-blocks n |
number of 16KB memory blocks (default 4) |
| -mem-mtx500 |
equivelent to -mem-blocks 2 |
| -n-subpages rom n |
set number of subpages |
| -romX file |
load ROM X from file |
| -rompairX file |
load ROM X and X+1 from file |
| -vid-win |
emulate VDP and TV using a graphical window |
| -vid-win-big,-v |
make window twice as large (realistic size) |
| -vid-win-hw-palette |
use an alternate palette |
| -vid-ntsc |
refresh at 60Hz (instead of 50Hz) |
| -snd-portaudio,-s |
emulate sound chip using portaudio |
| -snd-latency value |
instruct portaudio to use a given latency |
| -mon-win |
emulate 80 column card using a graphical window |
| -mon-win-big,-mw |
make window twice as high (realistic aspect ratio) |
| -mon-win-mono |
green screen monochrome |
| -mon-th,-mt |
emulate 80 column card using full screen text mode |
| -mon-console,-mc |
emulate 80 column card using console only |
| -mon-console-nokey |
keyboard status shows no keys pressed |
| -mon-no-ignore-init |
don't ignore writes to non-emulated registers |
| -kbd-remap |
remaps MTX keyboard (despite shift state) |
| -kbd-country n |
sets the country code switches to n (default 0) |
| -kbd-type string |
auto type keys in this string |
| -kbd-type-file fn |
auto type keys in this file |
| -joy,-j |
enable joystick support |
| -joy-buttons string |
define left,right,up,down and fire buttons |
| -joy-central n |
percentage off-centre to press direction |
| -serial1-in fn |
serial 1 input from file/pipe |
| -serial1-out fn |
serial 1 output to file/pipe |
| -serial2-in fn |
serial 2 input from file/pipe |
| -serial2-out fn |
serial 2 output to file/pipe |
| -sdx-tracks n |
specify tracks of first drive (default 80) |
| -sdx-mfloppy file |
specify .mfloppy file in SDX first drive |
| -sdx-tracks2 n |
specify tracks of second drive (default 80) |
| -sdx-mfloppy2 file |
specify .mfloppy file in SDX second drive |
| -sidisc-huge |
enable Silicon Disc huge mode |
| -sidisc-no-save |
don't save Silicon Disc content on termination |
| -sidisc-file n file |
specify Silicon Disc content for a drive |
| -prn-file file |
specify file to receive printer output |
| -tape-dir path |
.mtx files are in this directory |
| -tape-overwrite |
SAVE can overwrite an existing file |
| -tape-disable |
don't patch INOUT to LOAD/SAVE/VERIFY .mtx files |
| -tap-file fn |
specify ZX tape file (default memu.tap) |
| -sna-file fn |
specify ZX snapshot file (default memu.sna) |
| -cpm |
emulate CP/M BDOS |
| -cpm-drive-a path |
where CP/M BDOS finds A: files (default: .) |
| -cpm-invert-case |
invert between CP/M and host filenames |
| -cpm-tail tail |
construct CP/M command tail |
| -cpm-open-hack |
don't insist on EX,S1,S2,RC being 0 |
| -sdx |
SDX support in ROM 5 (or -sdx3 for ROM 3) |
| -fdxb |
FDXB CP/M support |
| -speed hz |
set CPU speed (default is 4000000, ie: 4MHz) |
| -fast |
don't limit speed, run as fast as possible |
| file.com tail ... |
-cpm -iobyte 0x80 -addr 0x0100 -mem file.com |
| file.run |
-iobyte 0x00 -addr 0xAAAA (from header) |
| file.mtx |
subsequent LOAD/SAVE/VERIFY "" will use this file |
The additional options for my version are:
| Switch |
Description |
| -vga |
emulate Propeller VGA
display |
| -serial1-dev dev |
serial 1 in/out
from device |
| -serial2-dev dev |
serial 2 in/out from
device |
| -cfx2 rom_file |
enable CFX-II
emulation and specify ROM image file |
| -cf-image c:p file |
specify data image for
partition (p) on card (c) |
| -cassette-in |
hardware emulation -
MTX or WAV file to load |
| -cassette-out |
hardware emulation -
MTX or WAV file to save |
| -mon-win-title |
set title for 80
column window |
| -mon-win-display |
set display to use for
80 column window |
| -vid-win-title |
set title for VDP
window |
| -vid-win-display |
set display to
use for VDP window |
| -help |
displays list of
options and exits |
The configuration dialog version also uses the same switches,
storing them in the
configuration file, but they may also be given on the command line. There are a few additional
switches listed below to support the operation of the dialog.
| Switch |
Description |
| -config-file file |
read configuration
options from file |
| -no-ignore-faults |
turn off permissive
options enabled by -config-file |
| -rom-enable rom_bits |
bit flags to enable
(1) or disable (0) a rom |
| -no-cfx2 rom_file |
disable CFX-II
emulation but specify ROM image file |
| -mon-size |
sets 80 col size (but
does not enable it) |
| -disk-dir |
directory containing
disk images |
| -tape-dir |
directory containing
tape files |
And finally, two further switches specific to the Raspberry Pi specific versions:
| Switch |
Description |
| -hw-config file |
specifies the GPIO interface to MEMU, documented
here |
| -gpu-mode mode |
controls the use of the GPU for screen upscaling (memu-pi only):
- mode = 1: Upscaling by ARM processor
- mode = 2: Upscaling by GPU with interpolation
- mode = 3: Upscaling by GPU without interpolation (default)
|
| Revision History |
| 2020-07-12 |
Minor fixes to
Autotype function and Wave file processing |
| 2020-05-19 |
Distribution files
updated with latest CFX-II ROM images (no source file changes) |
| 2020-05-10 |
The Propeller
emulation has been enhanced to include bug fixes and enhancements,
and the new CFX-II ROM is included (also the old one). There is also
an enhancement to VDEB to support setting breakpoints on specific
ROMs, which I used extensively in developing the new code. |
| 2019-12-26 |
Added Visual Debugger
Function - see documentation page
Bug fix on CTC emulation in timer mode with a zero constant
|
| 2019-11-17 |
First Release |
|
Downloads |
|
Download |
Build Date |
MEMU Base |
Description |
 |
2022-10-20 |
2019-10-12 |
Last Check for updates : 02/11/2022
Source Code Only |
|
|
2020-07-12 |
2019-10-12 |
Source Code |
|
|
2020-07-12 |
2019-10-12 |
Bare Metal Runtime
(Raspberry Pi) |
|
|
2020-07-12 |
2019-10-12 |
Raspbian Runtime
(Raspberry Pi) |
|
|
2020-07-12 |
2019-10-12 |
x86 Linux Runtime (32
Bit) |
|
|
2020-07-12 |
2019-10-12 |
Microsoft Windows
Runtime (32 Bit) |
|
|
2020-05-10 |
2019-10-12 |
Source Code |
|
|
2020-05-19 |
2019-10-12 |
Bare Metal Runtime
(Raspberry Pi) |
|
|
2020-05-19 |
2019-10-12 |
Raspbian Runtime
(Raspberry Pi) |
|
|
2020-05-19 |
2019-10-12 |
x86 Linux Runtime (32
Bit) |
|
|
2020-05-19 |
2019-10-12 |
Microsoft Windows
Runtime (32 Bit) |
 |
2019-11-17 |
n/a |
Memu-Pi
GPIO Configuration |
|