|
|
- With the RPi connected to the internet,
install the additional libraries required :
- sudo apt-get install libncurses5-dev
libX11-dev portaudio19-dev
- (This will fetch the required install
packages from the internet and install them)
|
- Choose a folder on the RPi where you want to
create the subfolders required to build the
application
- a convenient location is the pi
username's "home" directory, /home/pi
, on the RPi
|
- Create the following subfolders below the
chosen top level folder on the RPi (e.g. below
the /home/pi folder)
- ./dirt
- ./th
- ./mtx
- ./mtx/memu
- ./mtx/memu_pi
|
- The MEMU-Pi source package
contains only the files required to build the
MEMU executable, it needs DIRT (a library
of Directory Traversal code) and TH (a
library of Terminal Handling code) from Andy's
site - these libraries are required by MEMU.
- Extract
http://www.nyangau.org/dirt/dirt.zip
into the dirt folder created
above
- Compile the DIRT library using
- "cd dirt"
- "cp unix/* ."
(note the space character between"*" and
".")
- "make"
- Extract
http://www.nyangau.org/th/th.zip into
the th folder created above
- Compile the TH library using
- "cd ../th"
- "cp unix/* ."
(note the space character between"*" and
".")
- "make"
|
- MEMU-Pi is built on top of the
standard MEMU source code. Obtain the MEMU
source package from the
MEMU download page on Andy's site and
extract the files into the ./mtx/memu
folder created above
|
NB: MEMU-Pi should always be built on
top of the latest packages from Andy's site by
downloading from the links above, however, there may
be rare occasions where Andy's site is unavailable.
To allow MEMU-Pi to be built if
Andy's site is down, backup copies of the required
files can be downloaded from this page, but they
will almost certainly not be Andy's latest
production versions.
|
Archive |
Function |
Version |
|
 |
DIRT |
n/a |
|
|
TH |
n/a |
|
|
MEMU |
2014-01-03 |
|
- Extract the MEMU-Pi source
package into the ./mtx/memu_pi
folder created above, change to the ./mtx/memu_pi
folder and choose which MEMU version(s) that you
want to build
- "make memu"
Will compile the classic XWindow MEMU
as per Andy's distribution. The
executable is named memu.
Will compile standard MEMU but with
full-screen frame buffer instead of
XWindows This executable is named
memu-fb.
Will compile the MEMU-Pi
executable, named memu-pi. (This,
of course, has to be done on an RPi.)
- "make"
Will compile all versions.
These make options include some new
variations introduced in MEMU-Pi
Version 0.04
The make instructions for MEMU-Pi
Version 0.03 are available
here
|
- The required MEMU version can now be started
manually, by logging into the
./mtx/memu_pi
folder and running the appropriate executable.
|
|
Creating a Bootable Raspbian SD
Card for Raspberry Pi |
| The
Raspberry Pi downloads page provides
instructions for how to create the Raspbian SD Card
image, but a brief summary is included below :- |
- Download the latest Raspbian “wheezy” "hard
float" version :
YYYY-MM-DD-wheezy-raspbian.zip
|
- Unzip the file to a temporary directory to
expand the image file :
YYYY-MM-DD-wheezy-raspbian.img
|
- The image file must be written to the SD
Card using an image writing utility such as
Win32DiskImager
- This will create a small FAT partition
containing the Raspbian boot files
|
- Insert the SD Card into the Raspberry Pi and
power it on
- If the image file has been successfully
written, the RPi should boot and display the
Raspi Config Menu
|
|
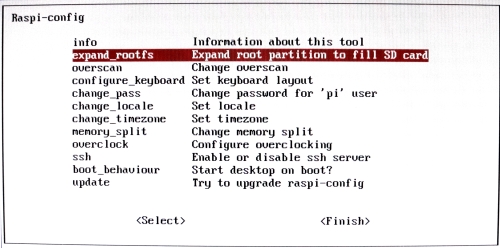 |
- Various configuration options for the RPi
can be set here, but at this point, it is only
worth using the second one to expand the Linux
partition to fill the SD Card to ensure that you
have enough space to install and configure
MEMU-Pi.
- If you plan on creating a self-booting
version of MEMU-Pi, a new file system, will
be written later
|
- Other options that may be of interest are :
- overclock - it is pretty
safe to change the frequency of the CPU from
700MHz to 800Mhz
- (For a brief discussion of
over-clocking and over-volting, see the
main
Raspberry Pi page)
- memory split - change the
GPU/CPU memory split, the default is 64MB to
the GPU, this is fine
- ssh - enable/disable the
ssh server, required for remote login to the
RPi
|
- After making the necessary changes, the RPi
will reboot with the revised configuration and
display the "login:" prompt. The default
username is "pi" and the default
password is "raspberry". Once you
log on, the default working directory is
/home/pi
|
|
|
|
Building MEMU-Pi On The
Standard Raspbian RPi Image |
- With the RPi connected to the internet,
install the additional libraries required :
- sudo apt-get install
libncurses5-dev libX11-dev portaudio19-dev
- (This will fetch the required
install packages from the internet and
install them)
|
- Choose a folder on the RPi where you want to
create the subfolders required to build the
application
- a convenient location is the pi
username's "home" directory, ~/pi
, on the RPi
|
- Create the following subfolders below the
chosen top level folder on the RPi (e.g. below
the ~/pi folder)
- ./dirt
- ./th
- ./mtx
- ./mtx/memu
- ./mtx/memu_pi
|
|
|
- If you do not already know the IP address
for the RPi, from the command line, enter:
- ip addr - this will
display the IP address for eth0, the
ethernet adapter on the RPi
|
- Open up a SCP session between the PC and the
RPi
|
- Extract
http://www.nyangau.org/dirt/dirt.zip
into a temporary folder on the PC, then use
WinSCP to copy the full directory
tree to the
/pi/dirt folder on the RPi
- On the RPi, change to the /pi/dirt
folder and compile the source files
- "cd ~/dirt"
- "cp unix/* ."
(note the space character between"*" and
".")
- "make" (should
create the file dirt.a)
|
- Extract
http://www.nyangau.org/th/th.zip
into a temporary folder on the PC, then use
WinSCP to copy the full directory
tree to the
/pi/th folder on the RPi
- On the RPi, change to the /pi/th
folder and compile the source files
- "cd ~/th"
- "cp unix/* ."
(note the space character between"*" and
".")
- "make" (should
create the file th.a)
|
- Obtain the MEMU source package from the
MEMU download page on Andy's site and
extract the files into a temporary folder on the
PC, then use WinSCP to copy the
full directory tree to the /pi/mtx/memu
folder on the RPi
- (There is no need to make the default
MEMU application at this point)
|
- Extract the MEMU-Pi source
files into a temporary folder on the PC, then
use WinSCP to copy the full
directory tree to the /pi/mtx/memu_pi
folder on the RPi
- On the RPi, change to the
/pi/mtx/memu_pi folder and make
MEMU-Pi
|
- If there are no errors, the MEMU-Pi
executable will have been built
- "dir memu-pi" should
confirm the presence of the executable
|
|
|
|
Building the Auto-Start MEMU-Pi SD
Card |
|
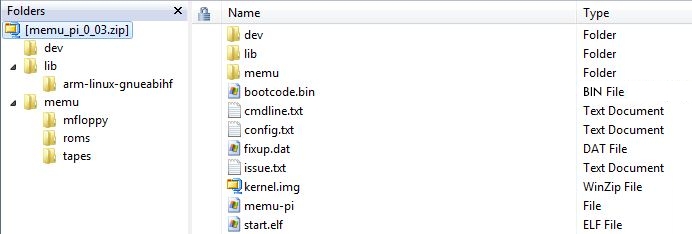
The required structure of the FAT formatted SD card
is shown here :- |
|
 |
| The boot process for the RPi is
described more fully on the
main RPi page, but
in brief, for MEMU-Pi, the FAT root
directory contains a number of files that are
required for the
RPi to boot, as well as the
supporting files
for MEMU-Pi :-
|
| Folder |
Contents |
Description |
| (root) |
bootcode.bin |
Loads and starts the
GPU |
| |
start.elf |
GPU Firmware |
| |
kernal.img |
Raspian Linux kernel [- up
to V0.03, this is the standard kernel.img] |
| |
fixup.dat |
Configures the RAM
partitions between the GPU and ARM CPU |
| |
issue.txt |
Kernel version [- for
information only] |
| |
config.txt |
RPi tuning parameters for CPU speed,
graphics configuration etc. |
| |
cmdline.txt |
Starts MEMU-Pi, rather than the usual Linux
start-up, entries :-
-
root=/dev/mmcblk0p1 [- Set the root file
system to the FAT partition]
-
rootfstype=vfat [- File system type is
FAT]
-
init=/memu/memu-pi [- Load MEMU-Pi
instead of the default]
|
| \lib |
".so" files |
Linux Library Files |
| \memu |
memu-pi.* |
MEMU-Pi
executable and configuration files |
| \memu\mfloppy |
*.mfloppy |
Disk Images (distributed
with MEMU) |
| \memu\roms |
*.rom |
ROM images (distributed with
MEMU) |
| \memu\tapes |
*.mtx |
Tape Images (distributed
with MEMU) |
|
| |
| The best way to
create an auto-booting SD card is to copy the
compiled MEMU-Pi application and
supporting files, such as tape and disk images, from
the RPi SD card onto a PC and combine them with a
minimal version of the Raspbian distro before
writing them back to a new SD card. |
- Create a working folder on the PC in which
to build the SD card contents and create the
directory structure shown in the above graphic,
including the empty "dev"
directory
- Using WinSCP :-
|
- Copy the following files from the
/boot directory on the RPi to the root
of your working folder :-
- bootcode.bin
- start.elf
- kernal.img
- fixup.dat
- issue.txt
(- optional)
- config.txt
- cmdline.txt
|
| Source - RPi |
Destination - PC |
| /lib/ld-linux-armhf.so.3 |
\lib\d-linux-armhf.so.3 |
| |
|
| /lib/arm-linux-gnueabihf/libc.so.6 |
\lib\arm-linux-gnueabihf\libc.so.6 |
| /lib/arm-linux-gnueabihf/libdl.do.2 |
\lib\arm-linux-gnueabihf\libdl.so.2 |
|
/lib/arm-linux-gnueabihf/libgcc_s.so.1 |
\lib\arm-linux-gnueabihf\libgcc_s.so.1 |
| /lib/arm-linux-gnueabihf/libm.so.6 |
\lib\arm-linux-gnueabihf\libm.so.6 |
|
/lib/arm-linux-gnueabihf/libpthread.so.0 |
\lib\arm-linux-gnueabihf\libpthread.so.0 |
| /lib/arm-linux-gnueabihf/librt.so.1 |
\lib\arm-linux-gnueabihf\librt.so.1 |
| |
|
|
/usr/lib/arm-linux-gnueabihf/libasound.so.2 |
\lib\arm-linux-gnueabihf\libasound.so.2 |
|
/usr/lib/arm-linux-gnueabihf/libcofi_rpi.so |
\lib\arm-linux-gnueabihf\libcofi_rpi.so |
|
/usr/lib/arm-linux-gnueabihf/libjack.so.0 |
\lib\arm-linux-gnueabihf\libjack.so.0 |
|
/usr/lib/arm-linux-gnueabihf/libportaudio.so.2 |
\lib\arm-linux-gnueabihf\libportaudio.so.2 |
|
- Copy the MEMU support files from the sources
to the destinations below :-
| Source - RPi |
Destination - PC |
|
/home/pi/mtx/memu/mfloppy/*.mfloppy |
\memu\mfloppy |
|
/home/pi/mtx/memu/mroms/*.* |
\memu\roms |
|
/home/pi/mtx/memu/tapes/*.* |
\memu\tapes |
|
- Copy the MEMU-PI executable from
/home/pi/mtx/memu_pi/memu-pi to \memu\memu-pi
|
- Edit the cmdline.txt file in
the root directory of your working folder
- replace the entry "root=/dev/mmcblk0p2"
with "root=/dev/mmcblk0p1"
- replace the entry "rootfstype=ext4"
with "rootfstype=vfat"
- add the entry "init=/memu/memu-pi"
|
-
When MEMU-Pi
starts, it looks for a file named
memu-pi.cfg which should contain the
"command line" options that would normally be
used to start MEMU. If the configuration file is
not found, the effect is the same as starting
MEMU with no options specified, i.e., the
program will halt. In this case, the RPi will
also halt as it has nothing else to do after
running MEMU-Pi In
the MEMU directory, create a memi-pi.cfg
file containing the following entries :-
-
-mem-blocks 36
-
-rom4
"/memu/roms/boot-type07.rom"
-
-rom5
"/memu/roms/sdx-type07.rom"
-
-kbd-remap
-
-kbd-country 0
-
-vid-win
-
-vid-win-big
-
-mon-win
-
-mon-win-big
-
-mon-ignore-init
-
-disk-dir "/memu/mfloppy"
-
-sdx-mfloppy
"/memu/mfloppy/andy_sys.mfloppy"
-
-tape-dir "/memu/tapes"
-
-rom-enable 0x33
|
- Once all of the files have been assembled,
copy the directory structure and all files from
your working folder to a blank, FAT32 formatted
SD card.
|
|
Creation of the
Auto-Start MEMU-Pi SD Card is now
complete |
| |
|
|