 |
The Raspberry Pi
+ |
 |
 
November 2019
THIS PAGE IS
OBSOLETE
(Building the Bare
Metal version of Memu-Pi)
See
this page for the current version of
Memu-Pi
MEMU-Pi
: Now with
MEMU-Pi is Bill Brendling's idea for implementation of
Andy
Key's Memotech Emulator,
MEMU, on a
Raspberry Pi (RPi).
For a complete description of the functionality of MEMU,
refer to the MEMU
page on Andy's site.
Introduction
Bill's first MEMU-PI implementations were based on building
the system on top of a base Linux (Raspbian)
operating system. Restrictions of the Raspbian GPL License meant
that a pre-built MEMU-PI system could not be distributed without
breaching the Raspbian license terms; the procedure for building a
system of your own was quite involved but full instructions for
building MEMU-PI on Raspbian are archived
on this page.
Making matters much simpler, Bill has now released a
bare
metal version of MEMU-PI. This does not require an operating
system to be preinstalled on the PI, but, as with the GPL terms
mentioned below for the Raspbian implementation, Bill's
distribution includes some source files as he describes below in
the bare metal MEMU-PI section.
Now that a bare metal version is available, most users are
unlikely to want to run MEMU on top of a Raspbian installation,
but the facility is there if needed. I have archived the
original Raspbian page here. That
page describes how to build Bill's MEMU-Pi from scratch, before
the bare metal version was released.
Bare Metal MEMU-PI
(Description by Bill Brendling - February 2019)
I now have a genuinely bare-metal version of MEMU for the
Raspberry Pi. I can't claim any credit for the bare-metal
part. I just took the "Circle" bare-metal environment produced
by R. Stange:
and ported MEMU to run in this environment.
Since Circle is
GPL licensed, to comply with GPL terms, the Zip file
(see below) contains a cut down copy of the Circle distribution
(missing all the samples and those add-on libraries which I did
not use). MEMU is
Public Domain software and as such, is compatible with GPL.
To run this version of MEMU, copy the contents of
the "boot" folder onto a FAT formatted SD card, insert into RPi,
connect keyboard and monitor and power up.
- To switch between the different MEMU windows press
<Ctrll> plus a Function Key :
| Typical
Function Key Assigments |
| <Ctrl> +
<F1> |
Circle boot messages + MEMU
diagnostics |
| <Ctrl> +
<F2> |
VDP |
| <Ctrl> +
<F3> |
CP/M (if MEMU is running in CP/M
mode) |
| |
Higher function keys if you have
any of the UI windows |
-
The <SysRq> key brings up the configuration dialog
The equivalent of the MEMU command line is "/memu.cfg"
(on the SD card). Note that the configuration dialog overwrites
this file. I might add a second configuration file that is not
overwritten for things like diagnostic switches.
This version
of MEMU can be compiled on Raspbian on a RPi. The "build" script
in the top folder compiles everything three times to produce
versions optimised for the different RPi processors. The actual
MEMU source is in the "app/menu" folder. It could also be
cross-compiled on an x86 Linux machine. See the Circle "README.md"
file in the top folder.
This is still a work in progress.
Running on Raspbian
Should you want to run MEMU-Pi on a Raspbian system,
installation from the Circle distribution is pretty
straightforward too :-
There are five different Raspbian
executables. Simplest solution for these is to unzip the whole
lot in a user home folder. The executables are then in the "memu-circle/app/memu"
folder.
However, another option (if you don't
want all the source), would be to first extract just the boot
folder (and its sub-folders), then extract the five executables
("memu", "memu-cfg", "memy-fb", "memu-cfb", "memu-pi") from the
"memu-circle/app/memu" folder into the already extracted "boot"
folder.
Building The System (Optional)
The source code there will build six versions of MEMU on a
Raspberry Pi. The first four versions will also build on x86
Linux. These versions are:
memu-circle/app/memu/memu:
This is the classic command line version
of MEMU, but with additional features (see below). It requires
XWindows, and is configured using the command line.
memu-circle/app/memu/memu-cfg:
This version also requires XWindows.
Configuration is specified by a configuration file "-config-file
memu.cfg" and a configuration dialog. Try <SysRq>,
<Windows> or <Windows Menu> keys to open the
dialog (not all environments pass all keys).
memu-circle/app/memu/memu-fb:
Command line version that does not
require XWindows. Instead each window is shown full screen
(using frame buffer). Use <Ctrl> plus function keys to
switch between windows.
memu-circle/app/memu/memu-cfb:
Configuration dialog version that does
not require XWindows.
memu-circle/app/memu/memu-pi:
Configuration dialog version that does
not require XWindows. Uses GPU to display. Can use RPi GPIO to
attach: MTX keyboard, Atari style joysticks, printer, PIO (Note
only 3.3v not 5v). Specify hardware as "-hw-config hardware.cfg".
Example file for MTX keyboard included.
memu-circle/boot/kernel*.img:
The bare metal versions for the different
RPi processors. This version uses two configuration files
"memu0.cfg" (static) and "memu.cfg" (changed by the
configuration dialog). It supports use of GPIO to attach
hardware (specify "-hw-config hardware.cfg" in "memu0.cfg"). At
present this version does not use the GPU, nor does it provide
DART emulation. More work to do. However it is currently the
best one to use for MTX-Pi.
Functionality
All of these versions include:
CFX-II Emulation:
Enable this with "-cfx2 rom_file". The
rom_file should be 16KB as Martin produces, it is automatically
split into ROM 4 and ROM 5. CF partitions are specified as
separate files, which means that the same files can be used as
either SID drives or CF partitions. Specify the partitions as -cf-image
c:p image_file", where "c" is card number (0 or 1) and "p" is
partition number on the card (0-7).
There is a technique to getting
into CFX CP/M mode. First press and hold both the keys.
Then press and hold the "C" key. Release the keys.
Continue to hold the "C" key long enough for the CFX ROM to
recognise CP/M mode required. This order is necessary because
XWindows will not report the second key if the "C" is
already down.
Enhanced keyboard re-mapping:
Enable this with "-kbd-remap". This now
works as per the Propeller hardware interface. By default Andy's
original mapping. Hit to make use of the three
"missing" keys to match the shift state of most characters.
to turn on so that keypad keys produce the digits as
labelled. The "-kbd-remap" switch also applies the ROM patches
to support the three extra keys.
Load and save audio (*.wav) files:
Enable this with "-cassette-in file" or
"-cassette-out file". The files may be either *.wav or *.mtx. *.mtx
files are converted to/from audio during load/save. Clearly this
is much slower than the usual way of loading *.mtx files. To
keep the file size down the attached Zip file only contains a
couple of examples in the "tapes" folder.
Slightly improved usage message:
If there is an issue with the command
line, it tells you which switch is causing the problem.
MEMU-Pi Operation
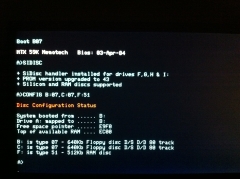
The image at the top of the page shows the screen output when
MEMU-Pi boots in colour CP/M mode.
Note: when running CP/M, many of the programs
available write to the emulated 40 Column MTX VDP screen, to
switch between the 40 column and 80 column screen to be
displayed on the RPi monitor, use "<ctrl> + <F1>"
and "<ctrl>" + "F2" key combinations (it must be
the left <ctrl> key).
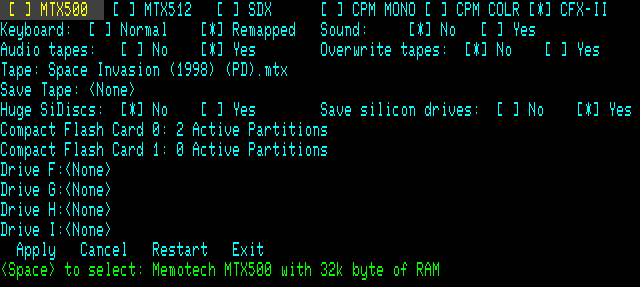
MEMU-Pi Configuration Menu
The system can be configured using a configuration menu,
invoked by either the "Sys Req" key or "Scroll Lock" (this
alternative is required as X-Windows masks "Sys Req").

The menu is navigated with the cursor keys and
the options selected with the <Space> bar.
|
MEMU-Pi
Menu |
| Group |
Option |
Description |
| Hardware |
MTX500 |
Memotech MTX500 With 32k byte of RAM |
| |
MTX512 |
Memotech MTX500 With 64k byte of RAM |
| |
SDX |
Memotech with 576k bytes of RAM and two type 07
disks |
| |
CPM MONO |
576k bytes of RAM, two type 07 drives, CP/M mono
monitor |
| |
CPM COLR |
576k bytes of RAM, two type 07 drives, CP/M
colour monitor |
| |
CFX-II |
576k bytes of RAM, two CF cards, Propeller VGA
Display |
| Keyboard |
Normal Keyboard |
Keys match MTX keyboard - Not always PC key
symbols |
| |
Remapped Keyboard |
Multiple keyboard modes - More closely match PC
key symbols |
|
Further details of the keyboard remapping function is described
on Andy's
MEMU keyboard page.
|
| Sound |
No |
Sound Disabled |
| |
Yes |
Sound Enabled |
| Audio Tapes |
No |
".mtx" files Only |
| |
Yes |
".mtx" and ".wav" Files |
| Tape |
Select "tape" to load |
Use Cursor Keys to select the required tape
(.mtx) file |
| Save Tape |
Select save "tape" |
Use Cursor Keys to select the required tape
(.mtx) file |
| Huge SiDiscs |
No |
[For CFX] SiDiscs limited to 8MB |
| |
Yes |
[For CFX] Huge SiDiscs for HexTrain |
| Save Si Drives |
No |
[For CFX] SiDiscs contents lost on exit |
| |
Yes |
[For CFX] SiDiscs contents saved (slow for huge
discs) |
| CF Card 0 |
Select "disk" to load |
[For CFX] Edit CF Partitions |
| CF Card 1 |
Select "disk" to load |
[For CFX] Edit CF Partitions |
| Drive B: |
Select "disk" to load |
[SDX/CPM] Select the required disk (.mfloppy)
file |
| Drive C: |
Select "disk" to load |
[SDX/CPM] Select the required disk (.mfloppy)
file |
| Drive F: |
Select "disk" to load |
[CPM/CFX] Select the required disk image
file |
| Drive G: |
Select "disk" to load |
[CPM/CFX] Select the required disk image
file |
| Drive H: |
Select "disk" to load |
[CPM/CFX] Select the required disk image
file |
| Drive I: |
Select "disk" to load |
[CPM/CFX] Select the required disk image
file |
| Action |
Apply |
Change disk and/or tape and continue MEMU |
| |
Cancel |
Continue MEMU with no changes |
| |
Restart |
Make changes and restart MEMU |
| |
Exit |
Exit MEMU and shutdown the Raspberry Pi |
| MEMU-PI
Distribution Files |
| |
| Bare Metal
MEMU-PI |
| Version |
Release Notes |
|
190610
 |
Stable Release
Includes
various bug fixesThings still to do include:
- Sound needs some more work. For the higher
end RPis I would like to run the sound chip
emulation on a separate core.
- DART emulation is not currently
supported. Circle's serial port driver is
currently only 3-wire. Also an emulation using
UDP for data transfer to emulate a Node ring.
Unzip the contents of the Boot folder to the root
directory of a FAT formatted SD Card.
|
|
190521
 |
Development
Includes
various bug fixes
Adds support for the
CFX-II
ROMThings still to do include:
- Circle is picky about USB keyboards. At
least one of mine is not detected, see if I can
work out why.
- Sound needs some more work. For the higher
end RPis I would like to run the sound chip
emulation on a separate core.
- DART emulation is not currently
supported. Circle's serial port driver is
currently only 3-wire. Also an emulation using
UDP for data transfer to emulate a Node ring.
Unzip the contents of the Boot folder to the root
directory of a FAT formatted SD Card.
|
|
190317
 |
Development
Includes latest
MEMU mods (to 2017-10-21)
Added MTX
Keyboard support on the GPIO pins (for
MTX-Pi)
Things still to do include:
- Circle is picky about USB keyboards. At
least one of mine is not detected, see if I can
work out why.
- Sound needs some more work. For the higher
end RPis I would like to run the sound chip
emulation on a separate core.
- DART emulation is not currently
supported. Circle's serial port driver is
currently only 3-wire. Also an emulation using
UDP for data transfer to emulate a Node ring.
Unzip the contents of the Boot folder to the root
directory of a FAT formatted SD Card.
|
|
190228
 |
First release
Things still to do include:
- Get Andy's latest MEMU mods and merge them
with my code.
- Add support for MTX keyboard on the GPIO
pins (for MTX-Pi).
- Circle is picky about USB keyboards. At
least one of mine is not detected, see if I can
work out why.
- Sound needs some more work. For the higher
end RPis I would like to run the sound chip
emulation on a separate core.
- DART emulation is not currently
supported. Circle's serial port driver is
currently only 3-wire. Also an emulation using
UDP for data transfer to emulate a Node ring.
Unzip the contents of the Boot folder to the root
directory of a FAT formatted SD Card.
|
+
Raspberry Pi
is a trademark of the Raspberry Pi Foundation, this website is
in no way affiliated to the Raspberry Pi foundation.
|