|
 |
The Memotech MTX Series |
Personal Computer News -
reproduced from PCN Project Website
(PCN ceased to exist in May 1985,
this project is endeavouring to create a digital archive of
all 110 issues which will be a valuable resource for retro
computing information for 1980's vintage machines. Please
support them by
purchasing a set of the archive DVDs.)
| Issue: 075 |
| Publication Date: August 25 1984 |
| Article Name: Memotech Screen Handling |
| Author: Keith Hook |
Screen Studies
The mysteries of the Memotech's screen handling features are
dispelled by Keith Hook's expert explanations
The Memotech's screen handling can initially seem difficult
to get to grips with - superficially it doesn't seem to have
direct memory mapping of the screen, and the manual doesn't
explain how you can write to and read from the screen using POKE
and PEEK. The confusion is basically caused by the way the
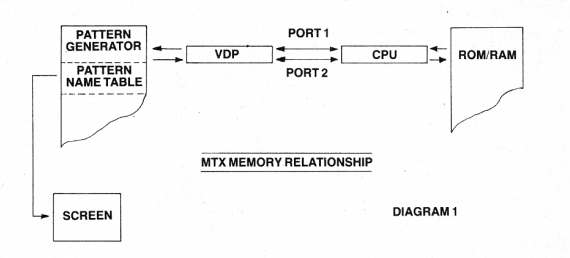
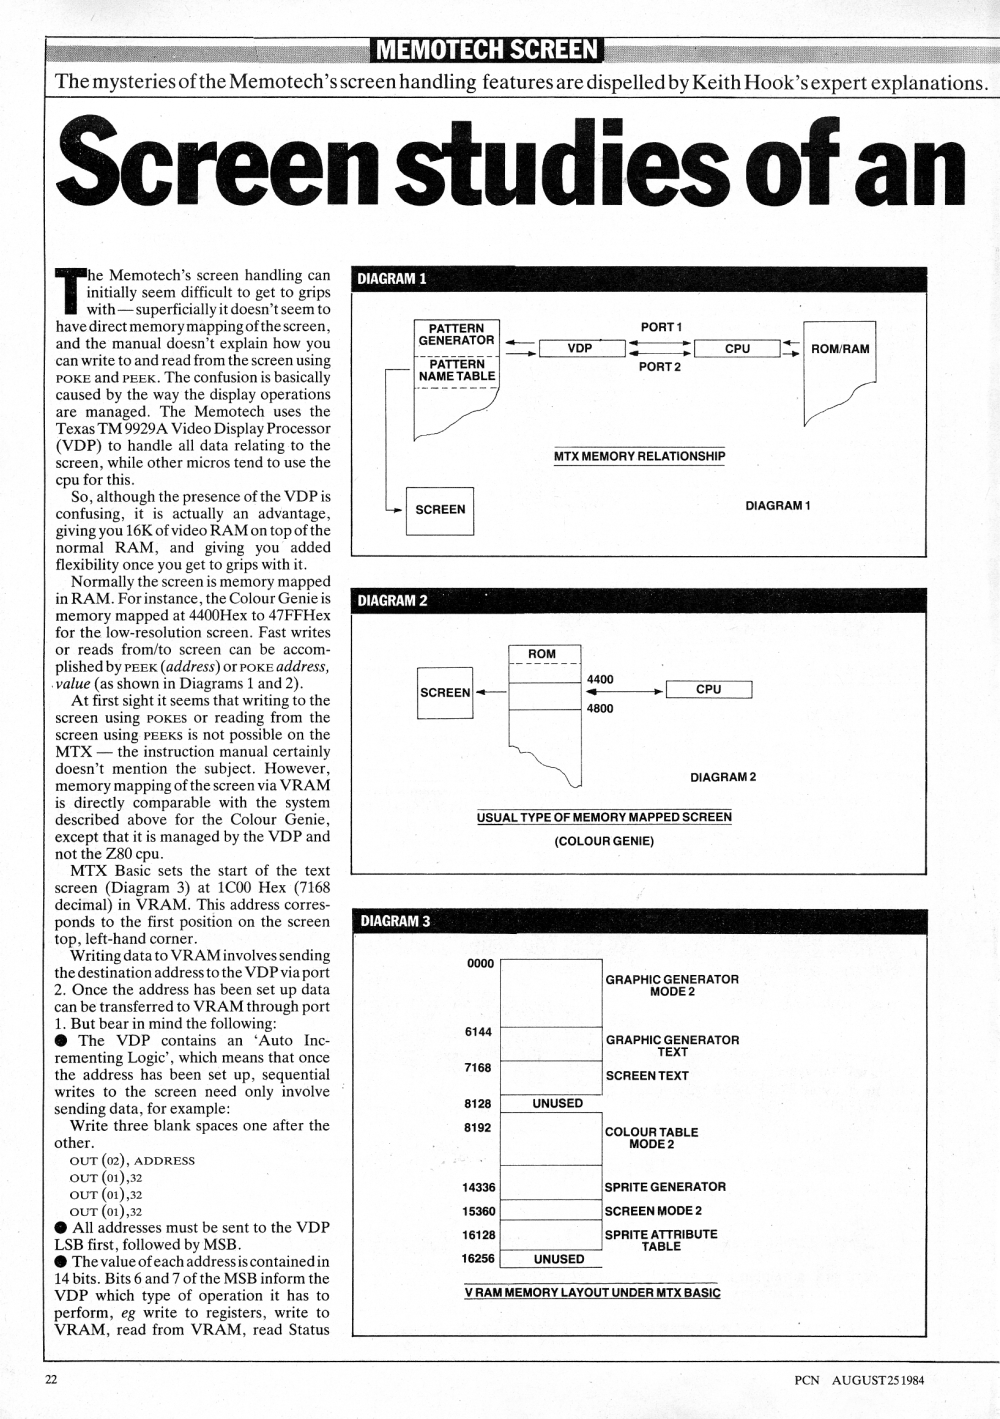
display operations are managed. The Memotech uses the Texas TM
9929A Video Display Processor (VDP) to handle all data relating
to the screen while other micros tend to use the CPU for this.
So, although the presence of the VDP is confusing, it is
actually an advanced, giving you 16K of video RAM on top of the
normal RAM, and giving you added flexibility once you get to
grips with it.
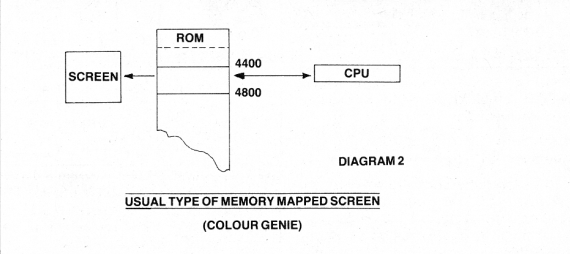
Normally the screen is memory mapped in RAM. For instance,
the Colour Genie is memory mapped at 4400Hex to 47FFHex for the
low-resolution screen. Fast writes or reads from/to screen can
be accomplished by PEEK (address) or POKE address, value (as
shown in Diagrams 1 and 2).
At first sight it seems that writing to the screen using
POKEs or reading from the screen using PEEKs is not possible on
the MTX - the instruction manual certainly doesn't mention the
subject. However, memory mapping of the screen via VRAM is
directly comparable with the system described above for the
Colour Genie, except that it is managed by the VDP and not the
Z80 CPU.
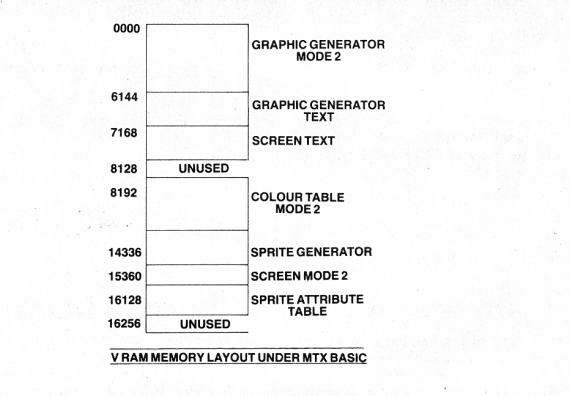
MTX Basic sets the start of the text screen (Diagram 3) at
1C00 Hex (7168 decimal) in VRAM. This address corresponds to the
first position on the screen top, left-hand corner.
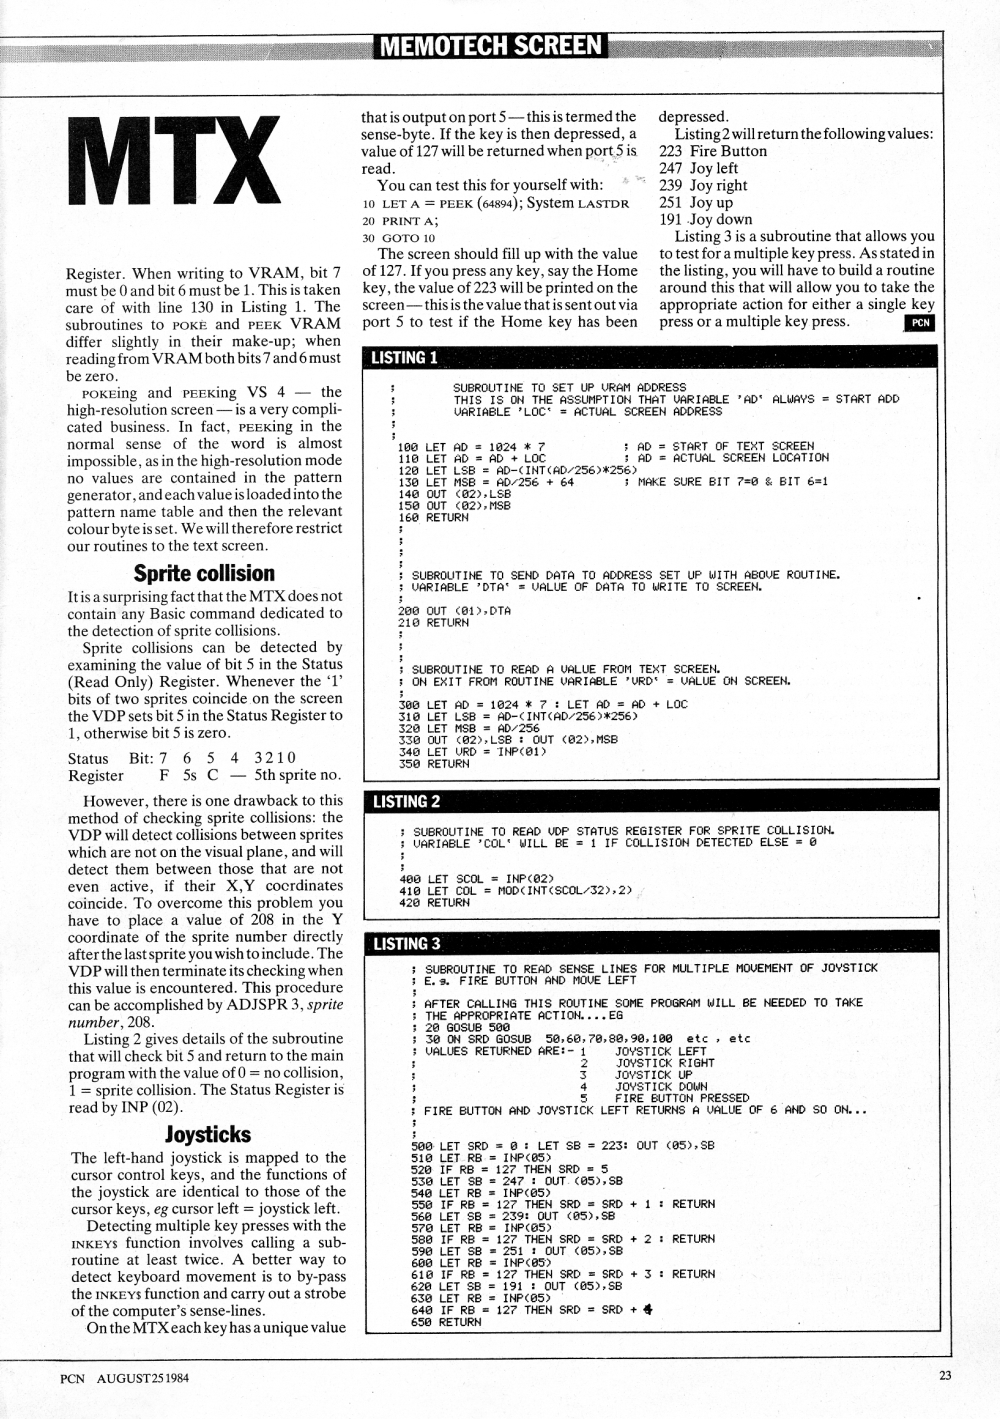
Writing data to VRAM involves sending the destination address
to the VDP via port 2. Once the address has been set up, data
can be transferred to VRAM through port 1. But bear in mind the
following:
•The VDP contains an 'Auto Incrementing Logic', which
means that once the address has been set up, sequential
writes to the screen need only involve sending data,
example:
Write three blank spaces one after the other.
OUT (02), ADDRESS
OUT (01), 32
OUT (01), 32
OUT (01), 32
•All addresses must be sent to the VDP LSB first,
followed by MSB.
•The value of each address is contained in 14 bits. Bits
6 and 7 of the MSB inform the VDP which type of operation it
has to perform, e.g. write to regsiters, write to VRAM, read
from VRAM, read Status Register. When writing to VRAM, bit 7
must be 0 and bit 6 must be 1. This is taken care of with
line 130 in Listing 1. The subroutines to POKE and PEEK VRAM
differ slightly in their make-up; when reading from VRAM
both bits 7 and 6 must be zero.
POKEing and PEEKing VS 4 - the high-resolution screen - is a
very compilcated business. In fact, PEEKing in the normal sense
of the word is almost impossible, as in the high-resolution mode
no values are contained in the pattern generator, and each value
is loaded into the pattern name table and then the relevant
colour byte is set. We will therefore restrict our routines to
the text screen
Screen Studies
It is a surprising fact that the MTX does not contain any
Basic command dedicated to the detection of sprite collisions.
Sprite collisions can be detected by examining the value of
bit 5 in the Status (Read Only) Register. Whenever the '1' bits
of two sprites coincide on the screen, the VDP sets bit 5 in the
Status Register to 1, otherwise bit 5 is zero.
| Status Bit |
7 |
6 |
5 |
4 |
3 |
2 |
1 |
0 |
| Register |
F |
5s |
C |
- |
Sprite No |
However, there is one drawback to this method of checking
sprite collisions: the VDP will detect collisions between
sprites which are not on the visual plane, and will detect them
between those that are not even active, if their X,Y coordinates
coincide. To overcome this problem, you have to place a value of
208 in the Y coordinate of the sprite number directly after the
last sprite you wish to include. The VDP will then terminate its
checking when this value is encountered. This procedure can be
accomplished by ADJSPR 3, sprite number, 208.
Listing 2 gives details of the subroutine that will check bit
5 and return to the main program with the value of 0 = no
collision, 1 = sprite collision. The Status Register is read by
INP (02).
Joysticks
The left-hand joystick is mapped to the cursor control keys,
and the functions of the joystick are identical to those of the
cursor keys, e.g. cursor left = joystick left.
Detecting multiple key presses with the INKEY$ function
involves calling a subroutine at least twice. A better way to
detect keyboard movement is to by-pass the INKEY$ function and
carry out a strobe of the computer's sense-lines.
On the MTX each key has a unique value that is output on port
5 - this is termed the sense-byte. If the key is then depressed,
a value of 127 will be returned when port 5 is read.
You can test this for yourself with:
| 10 LET A=PEEK(64894); System LASTDR |
| 20 PRINT A; |
| 30 GOTO 10 |
The screen should fill up with the value of 127. If you
press any key, say the Home key, the value of 223 will be
printed on the screen - this is the value that is sent out via
port 5 to test if the Home key has been depressed.
Listing 2 will return the following values:
| 223 |
Fire button |
| 247 |
Joy left |
| 239 |
Joy right |
| 251 |
Joy up |
| 191 |
Joy down |
Listing 3 is a subroutine that allows you to test for a
multiple key press. As stated in the listing, you will have to
build a routine around this that will allow you to take the
appropriate action for either a single key press or a multiple
key press.
(The original article and program listings are
here and here)
|
